FlutterFlow Stepper Form with Firebase Firestore
Introduction
I will show you how to create a custom widget in FlutterFlow to show a Stepper widget with form fields. We will submit the data to Firestore. This code is also reusable in non FlutterFlow generated apps.
You may copy and paste the code, but I want to walk through the thought process of how I would implement this for educational purposes. We will create an app saves the user’s grocery list.

Custom development
I get a lot of requests for custom tweaks of Google Maps with Flutter.
I have created a form to capture these requests to better understand everyone’s needs. You can also request custom Flutter Flow development and/or Flutter Flow training.
https://coffeebytez.com/contact-me/I will focus on the most highly requested items first, which will be available on my substack. I will also post exclusive in-depth tutorials there.
Please subscribe to my substack here:
https://coffeebytez.substack.com/?r=gdmkm&utm_campaign=pub-share-checklist
If you have urgent specific requests, please leave your contact information in the form.
Creating the Form Field
First, we will use the FlutterFlow UI builder to create a TextFormField. You may also write the code yourself. In the blank home page of your project. Drag and drop a form field and style it how you want. I will also add the hint text.

Creating the Firestore Collection
Now let’s create the Firestore Collection in FlutterFlow. I am assuming you have already followed FlutterFlow documentation on connecting your firebase project.
Click on the Firestore tab, then click Create Collection. It will ask if you want to use a template, and you can choose the product template. I have deleted some fields.

Creating the Custom Widget
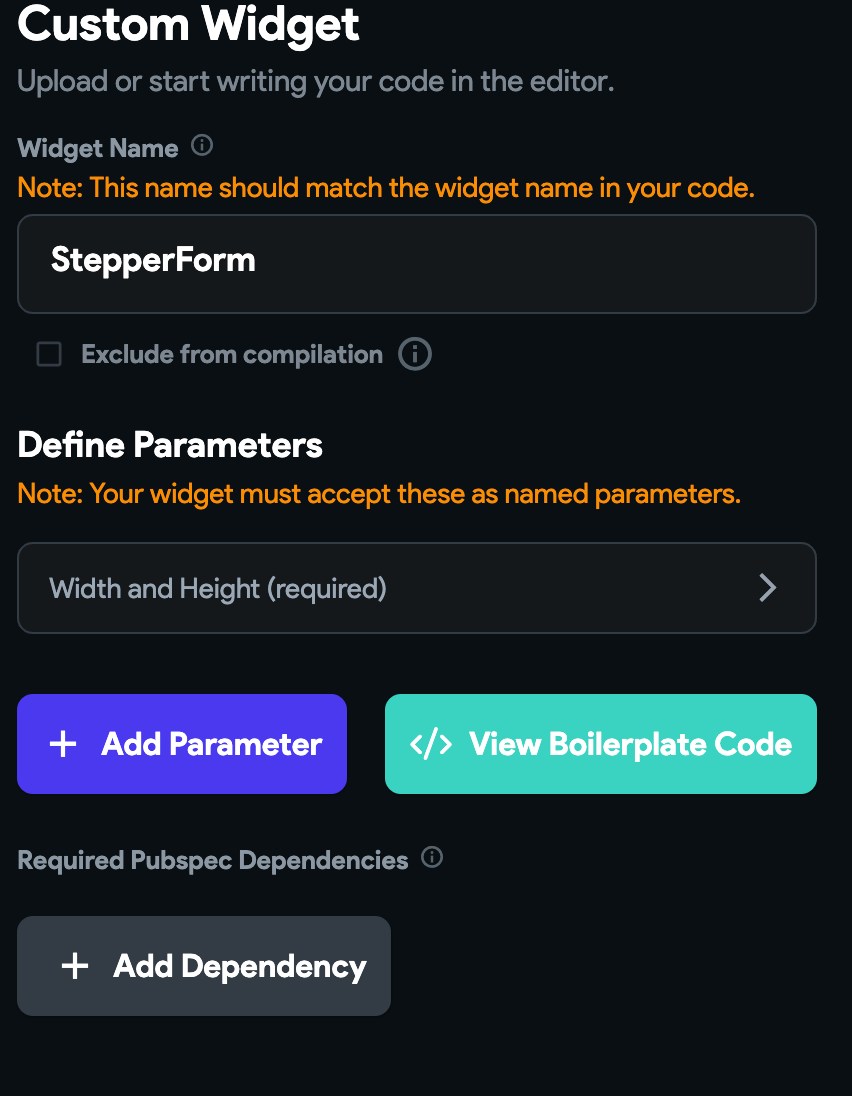
Now let’s create the custom form widget. Click the Custom Function tab on the left, then click the Custom Widget tab within that screen. Click the purple Create button. You should now see this screen. Name the widget and click View Boilerplate Code.
This will show another popup. Click Copy to Editor.

Click Save.
Go back to the TextField you created. Right-click on the TextField from the **Widget Tree **and click Copy Widget Code.

Go back to the custom widget you created and click the edit button (pencil icon). Above the build function, we will create another function that returns our form.
 @override
 Widget build(BuildContext context) {
Create a function that takes a textController and hint text. Type return, then copy and paste the code you copied earlier. The decoration code may be different depending on how you styled your code.
 Widget getTextFormWidget(
      TextEditingController textController, String customHintText) {
    return TextFormField(
      controller: textController,
      autofocus: true,
      obscureText: false,
      decoration: InputDecoration(
        hintText: customHintText,
        hintStyle: FlutterFlowTheme.of(context).bodyText2,
        enabledBorder: UnderlineInputBorder(
          borderSide: BorderSide(
            color: Color(0x00000000),
            width: 1,
          ),
          borderRadius: const BorderRadius.only(
            topLeft: Radius.circular(4.0),
            topRight: Radius.circular(4.0),
          ),
        ),
        focusedBorder: UnderlineInputBorder(
          borderSide: BorderSide(
            color: Color(0x00000000),
            width: 1,
          ),
          borderRadius: const BorderRadius.only(
            topLeft: Radius.circular(4.0),
            topRight: Radius.circular(4.0),
          ),
        ),
        errorBorder: UnderlineInputBorder(
          borderSide: BorderSide(
            color: Color(0x00000000),
            width: 1,
          ),
          borderRadius: const BorderRadius.only(
            topLeft: Radius.circular(4.0),
            topRight: Radius.circular(4.0),
          ),
        ),
        focusedErrorBorder: UnderlineInputBorder(
          borderSide: BorderSide(
            color: Color(0x00000000),
            width: 1,
          ),
          borderRadius: const BorderRadius.only(
            topLeft: Radius.circular(4.0),
            topRight: Radius.circular(4.0),
          ),
        ),
      ),
      style: FlutterFlowTheme.of(context).bodyText1,
    );
  }
Above this function copy these three lines of code. We will use the TextControllers to get the text from the TextField before submitting the form.
final nameController = TextEditingController();
final priceController = TextEditingController();
final quantityController = TextEditingController();
Now let’s create a Stepper Widget. Let’s get the code from Flutter’s official Stepper Widget documentation.
Stepper class – material library – Dart API
Replace your build method with the code from the documentation. At this point, you may want to save the code, then click edit again.
int _index = 0;

@override
  Widget build(BuildContext context) {
    return Stepper(
      currentStep: _index,
      onStepCancel: () {
        if (_index > 0) {
          setState(() {
            _index -= 1;
          });
        }
      },
      onStepContinue: () {
        if (_index <= 0) {
          setState(() {
            _index += 1;
          });
        }
      },
      onStepTapped: (int index) {
        setState(() {
          _index = index;
        });
      },
      steps: <Step>[
        Step(
          title: const Text('Step 1 title'),
          content: Container(
              alignment: Alignment.centerLeft,
              child: const Text('Content for Step 1')),
        ),
        const Step(
          title: Text('Step 2 title'),
          content: Text('Content for Step 2'),
        ),
      ],
    );
  }
We will replace the steps with our custom text fields.
We also copied the index variable, so that we may change Steps.
Replace the steps with the following code. In the first Step widget, we will have only one text field, which is the name field. Notice we are passing the nameController and the hint text.
In the second Step widget we have a column that holds the price text field, quantity text field and the save button. The save button calls a function called submit form, which we haven’t defined yet. We could also wrap the Stepper widget with a column and add the button at the bottom. For simplicity, we will keep it like this.
Step(
   title: const Text('Product Name'),
   content: getTextFormWidget(nameController, 'Enter The Product Name'),
),
Step(
    title: const Text('Product Name'),
    content: Column(
        children: [
            getTextFormWidget(priceController, 'Enter The Product Price'),
            getTextFormWidget(quantityController, 'Enter The Product Quantity'),
            ElevatedButton(
              onPressed: submitForm,
               child: const Text('Save'),
            ),
        ],
     ),
),
Save to Firebase
Above the build function, create another function named submitForm.
 void submitForm() async {

 }
In FlutterFlow’s UI builder, when creating an action to save the data, it has methods it generates that are exposed through backend.dart. It would generate code like this to save data. Although this will work if you download the code, it will not compile on the FlutterFlow platform.
final groceryRequestCreateData =
    createGroceryItemRecordData(
        name: nameController.text,
        price: double.parse(priceController.text),
        quantity: int.parse(quantityController.text),
    );
    await GroceryItemRecord.collection
    .doc()
    .set(emergencyRequestCreateData);
So let’s use the FlutterFire documentation to save this data to Firestore.
Cloud Firestore | FlutterFire
The following code shows the solution to submit the code to firebase.
First, we will put the reference to the GroceryItem collection. We are creating a random id using the grocery collection reference.
Can i generate Doc id from flutter to firebase without the method add?
Next, we are using setting the data using the textControllers. We have to parse price and quantity controllers to their respective data types.
CollectionReference groceryItemRef =
      FirebaseFirestore.instance.collection('GroceryItem');

 void submitForm() async {
    try {
      var randomId = groceryItemRef.doc().id;
      await groceryItemRef.doc(randomId).set({
        'name': nameController.text,
        'price': double.parse(priceController.text),
        'quantity': int.parse(quantityController.text)
      });
    } catch (e) {
      print('Error saving grocery item: $e');
    }
  }
Format and Save your code. Click edit again, then click Compile and Preview. You should see a preview of your form.

Test your custom StepperForm widget
Now let’s go back to the UI builder in FlutterFlow. Remove the text field you created and replace it with the custom StepperForm widget.

You can now use Test Mode to test it out.

After you click the Save button, go to Firestore in the Firebase console. You should see the data from your form. You could use a dialog to show the success of the submission.

Here is the complete code:
class StepperForm extends StatefulWidget {
  const StepperForm({
    Key? key,
    this.width,
    this.height,
  }) : super(key: key);

  final double? width;
  final double? height;

  @override
  _StepperFormState createState() => _StepperFormState();
}

class _StepperFormState extends State<StepperForm> {
  final nameController = TextEditingController();
  final priceController = TextEditingController();
  final quantityController = TextEditingController();

  int _index = 0;

  CollectionReference groceryItemRef =
      FirebaseFirestore.instance.collection('GroceryItem');

  void submitForm() async {
    try {
      var randomId = groceryItemRef.doc().id;
      await groceryItemRef.doc(randomId).set({
        'name': nameController.text,
        'price': double.parse(priceController.text),
        'quantity': int.parse(quantityController.text)
      });
    } catch (e) {
      print('Error saving grocery item: $e');
    }
  }

  Widget getTextFormWidget(
      TextEditingController textController, String customHintText) {
    return TextFormField(
      controller: textController,
      autofocus: true,
      obscureText: false,
      decoration: InputDecoration(
        hintText: customHintText,
        hintStyle: FlutterFlowTheme.of(context).bodyText2,
        enabledBorder: UnderlineInputBorder(
          borderSide: BorderSide(
            color: Color(0x00000000),
            width: 1,
          ),
          borderRadius: const BorderRadius.only(
            topLeft: Radius.circular(4.0),
            topRight: Radius.circular(4.0),
          ),
        ),
        focusedBorder: UnderlineInputBorder(
          borderSide: BorderSide(
            color: Color(0x00000000),
            width: 1,
          ),
          borderRadius: const BorderRadius.only(
            topLeft: Radius.circular(4.0),
            topRight: Radius.circular(4.0),
          ),
        ),
        errorBorder: UnderlineInputBorder(
          borderSide: BorderSide(
            color: Color(0x00000000),
            width: 1,
          ),
          borderRadius: const BorderRadius.only(
            topLeft: Radius.circular(4.0),
            topRight: Radius.circular(4.0),
          ),
        ),
        focusedErrorBorder: UnderlineInputBorder(
          borderSide: BorderSide(
            color: Color(0x00000000),
            width: 1,
          ),
          borderRadius: const BorderRadius.only(
            topLeft: Radius.circular(4.0),
            topRight: Radius.circular(4.0),
          ),
        ),
      ),
      style: FlutterFlowTheme.of(context).bodyText1,
    );
  }

  @override
  Widget build(BuildContext context) {
    return Stepper(
      currentStep: _index,
      onStepCancel: () {
        if (_index > 0) {
          setState(() {
            _index -= 1;
          });
        }
      },
      onStepContinue: () {
        if (_index <= 0) {
          setState(() {
            _index += 1;
          });
        }
      },
      onStepTapped: (int index) {
        setState(() {
          _index = index;
        });
      },
      steps: <Step>[
        Step(
          title: const Text('Product Name'),
          content: getTextFormWidget(nameController, 'Enter The Product Name'),
        ),
        Step(
          title: const Text('Product Name'),
          content: Column(
            children: [
              getTextFormWidget(priceController, 'Enter The Product Price'),
              getTextFormWidget(
                  quantityController, 'Enter The Product Quantity'),
              ElevatedButton(
                onPressed: submitForm,
                child: const Text('Save'),
              ),
            ],
          ),
        ),
      ],
    );
  }
}
Check out my other Flutter Flow articles
FlutterFlow Stepper Form with Firebase Firestore
Flutter Flow: Get Value From Multiple-Choice Choice Chips
Flutter Flow: Carousel Menu
Flutter Flow: Migrating the Carousel Menu to use data types
Flutter Flow: Adding Custom Markers for Google Maps
Flutter Flow: Use Supabase to show custom markers on Google Maps
Resources
Stepper class – material library – Dart API
Cloud Firestore | FlutterFire
TextFormField class – material library – Dart API
Can i generate Doc id from flutter to firebase without the method add?